
User Guide
- Basic Interface Overview
- Touch & Mobile support
- Keyboard & Desktop support
- The Bottombar
- The Bottom UI Button Bar
- The Top UI Button Bar
- The Central Menu
- POI Searches
- Routing
- Repositioning the map
- Clipboard Functionality
- User Configuration File
- Save and Load
- Offline Usage
- GeoJSON Import
- JSON API
- CLI Options
Basic Interface Overview
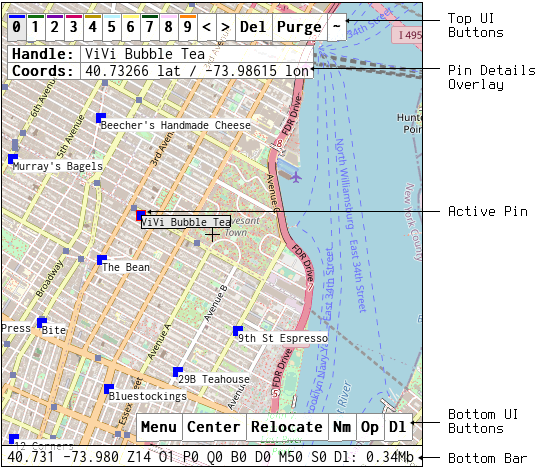
Mepo is a fast, simple, and hackable OSM map viewer for desktop & mobile Linux devices (like the PinePhone, Librem 5 etc.) and both environment's various user interfaces (Wayland & X inclusive). Its interface presents an SDL interactive application and auxiliary features are built out in scripts. The basic interface is essentially a OSM map that can be panned, zoomed, manipulated, and overlaid via 'pins' which are arbitrary points on the map which can be added by the user to mark locations (see below for a diagram of the general user-interface). Being a good unix citizen, the core application does one thing well, only focusing on displaying the map and visual overlays, and has no extra functionality; however mepo plays well with other applications and is scriptable and very customizable through its JSON API.
For end-users not interested in customizing the behavior of mepo, the
application is bundled with sensible defaults including a default set
of keybindings, touch-compatible configuration, and scripts written in
plain shell which enable features such as POI searches,
routing, and more. Throughout the rest of this guide it will
be assumed the user is making use of the default configuration and has
done no customization. See the install guide for
information on installation and ensure you have both the mepo binary
and mepo_*
scripts installed before continuing.
The Bottombar
The UI features a diagnostic bottombar which indicates a number of
numerical values based on the application state. Shorthand lettering
is used to save visual screenspace. The background color of the
bottombar changes based on tile downloading state. While in offline mode
(tile_cache_network as 0), the bar will
be red, while in online mode and idle the bar is white, while downloading
UI tiles the bar turns green, and while downloading background cache /
queued tiles the bar turns blue. See below for a visual labeling overview
of the bottom bar and explanation of each item.
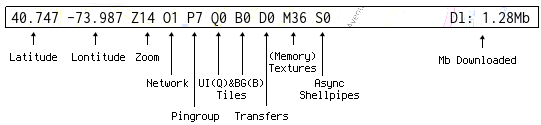
- Lat/lon: Indicates latitude & longitude at left start of bar
- Z#: Indicates the current zoom level (0-16)
- O#: Indicates if
tile_cache_networkis set to 1 or 0 for online or offline respectively - P#: Indicates current pingroup (0-9)
- Q#: Indicates number of queued UI tiles for downloading
- B#: Indicates number of queued BG tiles for downloading
- D#: Indicates number of current network transfers
- M#: Indicates number of tiles loaded to GPU/Memory cache
- S#: Indicates number of active shellpipe_async threads
- Dl: #: Indicates number of megabytes downloaded since boot
The Bottom UI Button Bar
The UI features a bar of buttons in the default configuration
indicated as text aligned in a bar at the bottom righthand of
the screen. Under the hood this is actually built out using the
bind_button JSON API command; so if you
want to add your own custom buttons (tied to userscripts, etc.) this
is doable.

- Menu: Launch the central menu
- Save: Saves the current state to
$XDG_CACHE_HOME/mepo/savestate.json - Load: Loads the statefile located at
$XDG_CACHE_HOME/mepo/savestate.json - Relocate: Relocate the map via Nominatim
- Nm: Search the current bounding box via Nominatim
- Op: Search the current bounding box via Overpass
- Dl: Download current viewport (all tiles in current/higher zoom levels)
The Top UI Button Bar
The UI features a bar of buttons in the default configuration indicated
as text aligned in a bar at the top lefthand of the screen similar to the
bottom button bar. The difference between
this bar and the bottom bar is that this button bar only appears
when there is a currently activated pin (this built out using the
bind_button JSON API command with the
first argument set to 1). Additionally the items in the top bar utilze
bind_button's group number functionality
for the 0-9 buttons to show a bar of color for each group transfer
button associated with the group's color (and also the currently active pingroup
will show as highlighted).

- 0-9: Transfer pin to group # (hold button to transfer all pins to group #)
- <: Switch to the previous pin in group
- >: Switch to the next pin in group
- Del: Delete currently active pin
- Purge: Purge all pins in group
- ~: Toggle pin detail metadata
Touch & Mobile Support
Using mepo on mobile linux devices such as the Pinephone, Librem 5, and postmarketOS devices and similar is a primary usecase. Take note of the following shortcuts:
- One finger drag: Pan the map
- One finger double tap: Zoom in
- One finger triple tap: Zoom out
- Two fingers pan gesture in: Zoom in
- Two fingers pan gesture out: Zoom out
- Three fingers rotate gesture clockwise: Increase UI fontsize
- Three fingers rotate gesture counterclockwise: Decrease UI fontsize
- One finger hold: Launch the central menu
Keyboard & Desktop Support
Ordinary desktop usage is supported. Ordinary one finger gestures referenced in the touch & mobile section also apply on the desktop; and in addition numerous hotkeys exist to allow functionality such as panning with vim-style keys and direct hotkeys to launch various scripts.
You can reference the default hotkeys
by studying the default configuration. Take note of the
bind_key commands to determine the
applications' default keybindings.
The Central Menu
Since most auxiliary features such as routing, POI searches, etc. are built out in shellscripts (which utilize zenity for menuing & user input); the central menu provides a central way to launch different scripts on mobile via touch or on the desktop without having to remember numerous hotkeys.
Below is an image of how the central menu may appear:
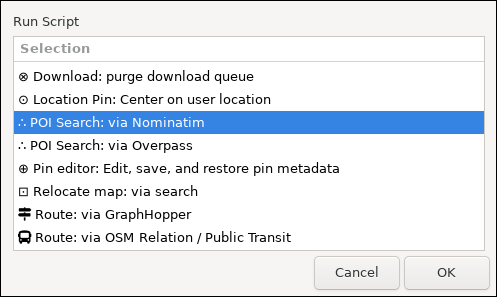
Here's an explanation of each options available in the central menu. Within parenthesis after the script name is the associated hotkey for desktop users. Also note clicking on each item will show the script source for each:
- Download: purge download queue (w): Clears the current download cache (background downloading of tiles).
- Download: bounding-box custom zoom levels (interactive) (q): Queues the current bounding box / viewport of the map to be downloaded in the background. Interactive, in that user is prompted for the minimum and maximum zoom-level to be downloaded.
- Download: bounding-box all zoom levels (non-interactive) (Q): Queues the current bounding box / viewport of the map to be downloaded in the background. Non-interactive, in that user is not prompted for zoom-level etc. All zoomlevels equal to and higher then the current zoom level are downloaded.
- Pins: Drop pin at crosshair (f): Drops a pin at the crosshair location.
- Update: Fontsize (Z): Updates the fontsize of the UI prompting the user for the input size. Presents menuing prefilled between sizes 12 and 30.
- Update: Online/Offline toggle (m): Toggles the UI between offline and online mode (e.g. flipping the preference tile_cache_network).
- State: Load (u): Loads the state (pins & preferences) from ~/.cache/mepo/savestate.json
- State: Save (i): Saves the state (pins & preferences) to ~/.cache/mepo/savestate.json
- Update: Tilesource (v): Updates the tilesource for the map to pull from. Note %1$d, %2$d, and %3$d are used to indicate X, Y, and Z variables respectively. Presents menuing with presets for OSM Maps, Stamen, OpenCycleMap etc.
- Update: Zoom (z): Updates the zoom level based on users input. Presents menuing to pick from zoom levels between 1 and 16.
- Relocate map: via search (g): Repositions the map latitude and longitude based on a Nominatim search query. Presents menuing to prompt user for input location and pick from Nominatim results.
- Route: via GraphHopper (R): Allows user to route between the first two pins in the active pingroup via the publicly accessible GraphHopper instance. Change variables in the presented select list to toggle parameters.
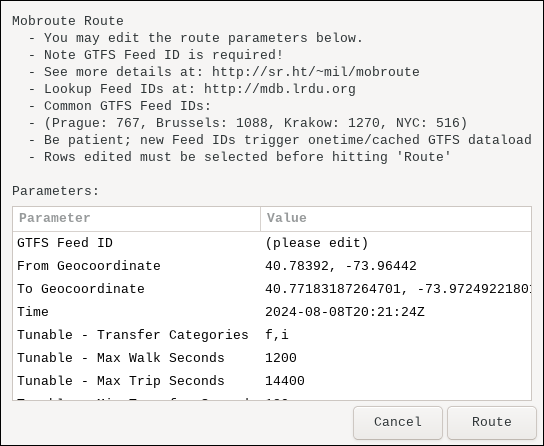
- Route: via Mobroute (Offline GTFS) (r): Allows user to route between the first two pins in the active pingroup via Mobroute. The route is calculated offline and GTFS data as needed is pulled automatically (see http://sr.ht/~mil/mobroute for details). The user is expected to provide the GTFS Feed ID (see http://mdb.lrdu.org) for details. The request maybe slow on initial routes and will be fast subsequently as GTFS data is cached locally. For this to work the user should install mobroute from their package manager and ensure the "mobroute" binary is in PATH.
- POI Search: via Nominatim (G): Searches for points of interest via the publicly accessible Nominatim API based on the current viewport. Presents menuing to prompt for input overpass query. Drops pins on the map for the resulting found points of interest in pin group 0; purging any previous pins in in group 0.
- POI Search: via Overpass (b): Searches for points of interest via the publicly accessible Overpass API based on the current viewport. Presents menuing to prompt for input overpass query. Drops pins on the map for the resulting found points of interest in pin group 0; purging any previous pins in in group 0.
- Location Pin: Center on user location (x): Determines the user location via GPSD or Geoclue. When provided with no argument runs the function
droppinactivateandcenterwhich both drops a pin on the map and centers the map. Meanwhile the functiondroppincan be used in isolation to only drop a pin on the map in pingroup 6. This script may be used synchronously or asynchronously; within the default configdroppinis used asynchronously viashellpipe_async. Note, due to deprecation of MLS; Geoclue may be less reliable or this script may not always work as expected recently - see: https://gitlab.gnome.org/GNOME/gnome-control-center/-/issues/2959
POI Searches
Points of interest within the current viewport (bounding-box) can be searched both via Nominatim or via Overpass using the default included scripts. Each of these methods has its advantages and disadvantages. Generally speaking, for specific name-based searches within a region, you should use Nominatim; while for flexible OSM-tag-based searches you should use Overpass.
As described above, Nominatim excels at name based searches. For
example if you wanted to find a restaurant called "Joe's Pizza" you could
type this directly into the Nominatim POI search script prompt. Or
similarly to find a starbucks, you could just type in "starbucks" in
the Nominatim prompt. Either select the Nm UI button to launch
a Nominatim POI search or select POI Search: via Nominatim from
the central menu.
Meanwhile, Overpass is more powerful and suited then Nominatim for
POI searches based on OSM tags; for example if you wanted to find
all coffeshops, (rather then just a specific name of a coffeshop such as
"starbucks" in the previous example) you could search for the general
OSM tag [amenity=cafe]. This will find all OSM relations matching this
tag within the current bounding box. A number of prepopulated OSM tags
are available within the provided Overpass script; however if you want
to search any custom OSM tag, simply enter it and this will work just
the same. Either select the Op UI button to launch
a Overpass POI search or select POI Search: via Overpass from
the central menu.
Routing
Routing may be accomplished by two mechanisms:
- Via the bundled GraphHopper Script: This script uses the public GraphHopper instance (via curl) to determine a walking/driving routes. This requires a network connection.
- Via the bundled Mobroute Script: This script utilizes the mobroute CLI for GTFS dataload & route calculation. GTFS data is loaded to the system upon first usage and then subsequent routes are calculated offline (see Mobroute's documentation for more details).
As for end-user experience: Both of the routing scripts use the
same mechanism for determining from/to location to route and changing
parameters. Before launching either routing script, atleast 2 pins must
be active in the current pingroup which will be routed between (Note,
you can drop arbitrary pins on the map by using the Pins: Drop pin at
crosshair script in the central menu or by pressing the f hotkey). Once
the routing script is launched you will be presented with a number of
changable parameters as in the sceenshot below. It is very important to
realize that changed rows must be selected before hitting the 'Route'
button to confirm. Below is a screenshot of the route parameters menu:
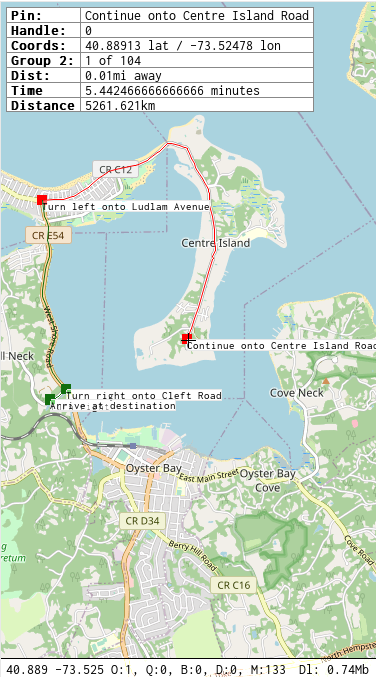
Below is an example image of how a rendered route for GraphHopper may appear. Note each 'step' is added to the map as a pin in an ordered pingroup (and thus connected by a line):
Repositioning the map
You may reposition the map based on a Nominatim query.
Select from the central menu the entry entitled
Relocate map: via Nominatim. You may also press the button in the
button bar entitled Relocate to launch this
script as well. You will be presented with menuing to prompt for a
Nominatim query. You may enter a region (e.g. like Vancouver Canada),
a street address (like 20 Jay street), or a point of interest (like
Washington DC capitol). Nominatim will be queried and you may pick from
the resulting list to reposition the map.
You may also reposition the map based on geolocation select
from the central menu the entry entitled
Location Pin: center on user location. This script uses either
Geoclue2 or GPSd to determine the user's position and both
drops a pin on the map at that location and repositions the map
as well to center on that pin. (Note: since the deprecation of
MLS,
the functionality of this script may be unreliable)
Clipboard functionality
The clipboard may be used to run arbitrary JSON API expressions or relocate the map to an specific geocordinate. Currently in the default configuration clipboard functionality is only accessible via keybindings.
The keybinding y yanks the current coordinates of the map into the
clipboard in the format of lat, lon.
Meanwhile, the keybinding Shift-y can either restore geocoordinates
(such as in the form lat, lon as yanked with y); or alternatively may
run JSON API expressions code if not fitting the lat, lon pattern. Using
Shift-y you may thus simply recall a previous location yanked with
y (which is vaguely reminiscent of vim marks). If the pattern in the
clipboard does not look like geocoordinates, what's in the clipboard on
pressing Shift-y will be run as JSON API code.
User Configuration File
The defacto userconfiguration file is located at
$XDG_CACHE_HOME/mepo/config.json (e.g. ~/.config/mepo/config.json).
Within this file, you may store JSON API commands to run. Reference the
JSON API guide for more details.
A simple configuration file for mepo to store in ~/.config/mepo/config
to reposition the map to Boston, MA, US and have an arbitrary bookmark
pin named foopin placed on the map, might look like:
[
  {
    "cmd": "prefset_n",
    "args": {"pref": "lat", "value": 42.3608}
  },
  {
    "cmd": "prefset_n",
    "args": {"pref": "lon", "value": -71.0573}
  },
  {
    "cmd": "prefset_n",
    "args": {"pref": "zoom", "value": 15}
  },
  {
    "cmd": "pin_add",
    "args": {
      "handle": "foopin",
      "pingroup": 3,
      "lat": 42.355 ,
      "lon": -71.0780
    }
  }
]
Save and Load
Both from the bottom bar Save and Load UI
buttons and in the central
menu scripts for the same, you can save and reload state.
State is saved as JSON API commands to the file
$XDG_CACHE_HOME/mepo/savestate.json. The save and load functionality
can help you quickly test search queries, manipulate the map, and
subsequently reload a prior state.
In versions of Mepo prior to 1.3.0 autosaving/loading was integrated in the default configuration; after 1.3.0 autosaving/loading has been removed, and rather the user configuration file can be utilized if the user wants to automatically load something. If you want to restore autosave/load functionality as Mepo was configured prior to 1.3.0 had, you can add the following JSON API commands to your user configuration file:
[
  {
    "cmd": "fileload",
    "args": { "filepath": "$XDG_CACHE_HOME/mepo/savestate.json"}
  },
  {
    "cmd": "bind_quit",
    "args": {
      "exps": [{
          "cmd": "filedump",
          "args": { "datatypes": "rp", "filepath": "$XDG_CACHE_HOME/mepo/savestate.json" }
      }]
    }
  }
]
Offline Usage
Mepo prioritizes offline usage as a first-class usecase. The mepo
application itself presents an SDL2 view of OSM tiles on the map along
with a background thread that interfaces with curl for downloading
tiles. This background downloading thread has the ability to be completely
disabled through a JSON API preference
named tile_cache_network (when the tile_cache_network property is 0,
you'll see the bottom bar turn red and O0 indicating Mepo is offline;
otherwise you are online by default). Do note tile_cache_network
does not effect any scripts called.. if you wish to use scripts
utilizing Nominatim or Overpass etc. offline for example for running
your own instances locally, these ENV parameters are customizable (see
the associated mepo_* scripts in your PATH).
Downloading tiles interactively (via UI): By default, dragging
the map will download tiles on the screen as needed assuming you are
online (tile_cache_network is set to 1). In addition to this default
behavior; the button bar entry labeled Dl
will download all tiles in the current viewport (current zoom level and
higher) to the filesystem cache. (E.g. so you may zoom out and download
an entire givne region for all zoom levels). Additionally; you may
also select Download: current bounding-box (non-interactive) from the
central menu for the same functionality. The entry
Download: custom region (interactive) in the central menu allows you
to download a custom region via Nominatim
search query.
Downloading tiles non-interactively (via commandline): It's a
common use case to need to download an entire block / bounding box of
tiles while online before going offline. For example, say if you want
to use your phone with mepo but are not sure you'll not have internet
access at your destination. To facilitate downloading of tiles, you
may do this from the UI using the Dl button as described above,
but mepo additionally features a non-interactive tile downloading CLI
accessible through using the -d flag. This flag should be suffixed
with a list of 6 comma separate parameters (no whitespaces) in the form
of lat_a,lon_a,lat_b,lon_b,zoom_min,zoom_max. Zoom min and max can
range from 0-16. For example, to download a bounding box:
mepo -d40.74946,-74.04673,40.818358,-73.88211,3,16
This may be a bit more involved then you would like
to get, so as an alternative you can use the provided
mepo_dl.sh
script which provides a prompt-driven dialog which queries
Nominatim to determine the bounding box to
download and then feeds this into mepo -d. Run this script as:
mepo_dl.sh
GeoJSON Import
The script bundled with mepo named mepo_geojson_import.sh can be used
to convert standard GeoJSON to the relevant JSON API
pin_add commands. This script may be used in a few different ways.
You can add the GeoJSON converted points to your config by appending the result to your config:
cat my_geojson_file.json | mepo_geojson_import.sh > ~/.config/mepo/config.json
Or this script may be in combination with mepo's -i flag to turn mepo
into a standalone GeoJSON viewer (note: see more details on using mepo
-i here). For a quick example: alternatively
to using the Mobroute interactive routing script as explained in the
routing section above, you directly can view the output of
mobroute CLI's generated GeoJSON routes
directly on boot in mepo via:
mobroute run route -rp '
  {
    "route_params": {
      "feed_ids": [ 1088 ],
      "from": [ 50.85728, 4.351426 ],
      "to": [ 50.83214, 4.350534 ],
      "transfer_categories": [ "f", "i" ],
      "output_formats": [ "geojson" ]
    }
  }
' | jq '.geojson' | mepo_geojson_import.sh | paste -sd' ' | mepo -i
JSON API
Mepo features an extensible JSON API which is used both for end-user configuration and arbitrary scripting. See the JSON API page for configuration details; and scripting guide for more information on JSON API usage.
CLI Options
-docmd: Print markdown documentation for the JSON API to STDOUT.-i: Read JSON commands from STDIN continually (newline seperated). Can be used for interactive debugging or scripting via:tee | mepo -ior./myscript | mepo -i.-e: Enable debug mode to log messages to STDERR.-hw: Force using hardware renderer rather then default auto (HW/SW) renderer.-sw: Force using software renderer rather then default auto (HW/SW) renderer.-tx#: Number of textures to load to (GPU) memory for both OSM & pile tile layer cache (defaults to 200).-v: Print version number.-h: Print this help text.-dlat_a,lon_a,lat_b,lon_b,zoom_min,zoom_max: Non-interactively download tiles for given range.